VAUBAN FORTRESSAs the foremost military engineer of his time, French nobleman Sebastien de Vauban lent his name to a particular style of fortification. During the Napoleonic wars, the most common fortress in Europe had the hallmarks of Vauban design.
This step-by-step terrain building guide will explain how to reconstruct a Vauban fortress in 15mm scale, using simple hobby supplies--all listed in the column to the right. My own fortification is loosely modelled after the "Peter and Paul" fortress of St. Petersburg, and I built it specifically to play the scenario "Siege of Danzig (1807)." |
COST: $15
|
#1. Designing the Fortress
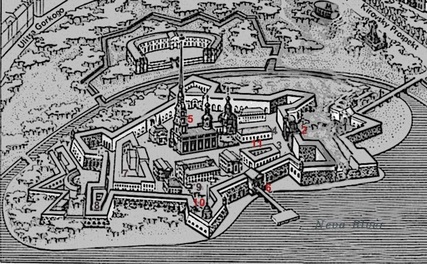
The Peter & Paul Fortress, St. Petersburg
Scratch-building a model of this size requires careful preparation and planning. When selecting a design, you'll want to strike a balance between historical accuracy and practical use on the gaming table.
Practical Requirements: (1) Large enough inside the walls to fit several buildings; (2) Not so sprawling that the fortress overwhelms a 6'x4' tabletop; (3) Ramparts wide enough for a stand of infantry; (4) Bastions can accomodate a battery of artillery
Historical Requirements: (1) Hallmarks of classic Vauban engineering--triangular bastions, sloping walls, and a traditional pentagon shape; (2) I did not want to build a perfectly symmetrical fort; (3) Achieve some historical flavor by modelling my design on the famous Peter and Paul fortress of St. Petersburg
#2. Laying the Foundation
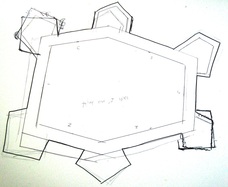
After you've spent time sketching a design on paper, it's time to create a full-scale footprint. Trace the footprint on paper and make sure you're happy with it before proceeding. Now is the time to make adjustments if you don't like the outline. Place some miniatures and even several buildings inside the footprint to ensure it's scaled the way you want.
By now, the footprint should include a line for the inner wall and the outer wall. The gap between the two walls will be the ultimate width of the rampart for your infantry to stand. A stand of infantry in Age of Eagles is 1" x 3/4", so I elected to create a 3/4" wide rampart.
To create the fortress walls, take a sheet of hobby foamboard and cut two long strips. The first strip should be 1" tall--this will be the inner wall. The next strip should be 1.5" tall--this will be the outer wall. Use the footprint drawing to measure the appropriate lengths of foamboard.
#3. Install the Ramparts
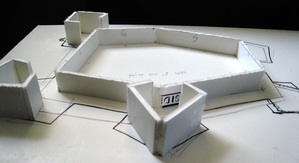
Once all the walls are cut, stand them upright. Use small pieces of scotch tape to temporarily hold the walls together. Assuming you measured and cut correctly, the inner and outer walls should be evenly separted by a 3/4" gap. To span the gap and create a sturdy rampart, I used balsa wood. You could use heavy card-stock, as well.
When dealing with the triangular bastions, my replica of the Peter and Paul fortress parted from historical reality. You may notice in the picture of the historical fortress that the bastions are hollow. For practical wargaming purposes, I needed to fill the entire bastion with rampart space so my artillery had enough room.
When dealing with the triangular bastions, my replica of the Peter and Paul fortress parted from historical reality. You may notice in the picture of the historical fortress that the bastions are hollow. For practical wargaming purposes, I needed to fill the entire bastion with rampart space so my artillery had enough room.
#3.5. Battle Damage?
|
 |
#4. Those Damn Sloping Walls
Gently sloping walls are a hallmark of Vauban design, so this step is unavoidable. Unfortunately, this step is also a major pain in the ass, since it requires patience and some trial-and-error.
Begin by finding an empty cereal box and cutting the thin cardboard into strips 1.75" wide. Remember, your exterior fortress walls are 1.5" tall, so the difference in height allows you slope the walls outward at an angle. Using trial-and-error, begin applying sections of cardboard to the bastions. Don't worry if the seams aren't perfect--this can be covered up later. Use scotch tape to temporarily hold the cardboard strips in place while you apply craft glue (see a photo example of this under step #7). Remove the tape when the glue dries.
Technically, every exterior wall should have the sloped effect, but I cheated and only sloped the bastions. Why? Because I hated this step, that's why! And it looked just fine.
#5. Tissue Texturing
If you've made it this far into the building process, you're looking at a rough, jagged lump of cardboard and foamboard. Now it's time to transform that mess into a realistic replica. To make that leap forward, you'll need to texture every square inch of your fortress to hide all the gaps and imperfections.
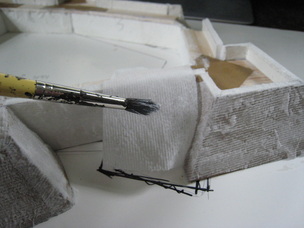
I employ a secret weapon to help add great texture to walls: TISSUES. That's right, normal, household tissues. When applied correctly, tissues look just like a plaster or stucco finish. Begin by gathering plenty of tissues--the thinner the better. If you have nice tissues in your bathroom, they're probably comprised of two thin layers that you can gently pull apart. Do this. You can also use single-ply toilet paper if tissues aren't readily available.
Moving one wall at a time, coat the inner and outer walls with watered-down craft glue. Make sure the glue is not too heavy or thick--you want a thin, even coat. Now gently press a thin tissue into the wall. Carefully apply additional glue with an old paint brush, if necessary. Applying extra glue can flatten down any tissue edges (be gentle, so as not to rip your tissues).
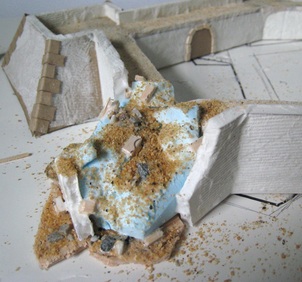
After you're done with the tissues, it's time to texture the ramparts. Spread watered-down craft glue on the ramparts and inside the bastions. Then sprinkle sand or very fine gravel over the glue. Allow time to dry. In the next step, you'll paint this rough texture to look like dirt or crushed stone.
I employ a secret weapon to help add great texture to walls: TISSUES. That's right, normal, household tissues. When applied correctly, tissues look just like a plaster or stucco finish. Begin by gathering plenty of tissues--the thinner the better. If you have nice tissues in your bathroom, they're probably comprised of two thin layers that you can gently pull apart. Do this. You can also use single-ply toilet paper if tissues aren't readily available.
Moving one wall at a time, coat the inner and outer walls with watered-down craft glue. Make sure the glue is not too heavy or thick--you want a thin, even coat. Now gently press a thin tissue into the wall. Carefully apply additional glue with an old paint brush, if necessary. Applying extra glue can flatten down any tissue edges (be gentle, so as not to rip your tissues).
After you're done with the tissues, it's time to texture the ramparts. Spread watered-down craft glue on the ramparts and inside the bastions. Then sprinkle sand or very fine gravel over the glue. Allow time to dry. In the next step, you'll paint this rough texture to look like dirt or crushed stone.
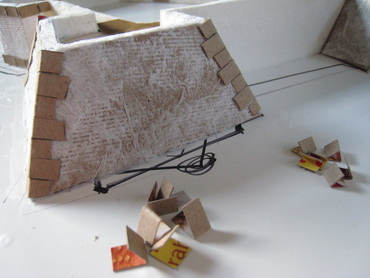
#6. Adding StoneworkWhile not entirely necessary, adding some stonework to your fortress is worth the extra effort. Use leftover thin cardboard from a cereal box and cut it into small rectangles. You can add stonework detail as much--or as little--as you want.
Personally, I spent about one hour carefully hand-gluing cardboard "stones" to the outside corners of every bastion. Tedious? Yes, but worth the payoff. At this stage I also created two doorways into the fortress. Instead of creating an elaborate gatehouse (which I seriously debated), I took the simpler route of framing generic stone archways. |
 |
#7. Building Optional Ravelins?
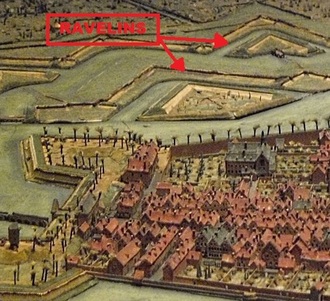
Another optional step for those of you who want to go above and beyond. So far, everything you've built is technically the inner shell of a more complex system. Marshal Vauban believed in the principle of "defense in depth." Thus, additional entrenchments and interlocking outposts accompanied most Vauban fortresses. Ravelins, or small triangular outposts, often appeared between the corner bastions of the main walls. In the left picture you can see how this system worked.
If you scroll back up to the drawing of the Peter & Paul fortress, you can see an unusual double-triangle ravelin left of the main fort. The more you research, the more you'll realize that no two ravelins were exactly alike in design.
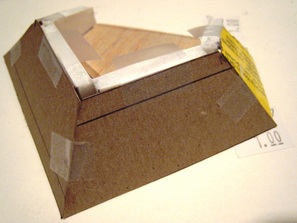
To build ravelins you need to cut some scraps of excess foamboard into the right shape, and install a balsa wood platform inside for defenders to stand on. Some ravelins had open backs with sloped earth platforms (like my design, seen below) while other ravelins were enclosed on all sides.
If you scroll back up to the drawing of the Peter & Paul fortress, you can see an unusual double-triangle ravelin left of the main fort. The more you research, the more you'll realize that no two ravelins were exactly alike in design.
To build ravelins you need to cut some scraps of excess foamboard into the right shape, and install a balsa wood platform inside for defenders to stand on. Some ravelins had open backs with sloped earth platforms (like my design, seen below) while other ravelins were enclosed on all sides.
 |
 |
#8. Paint, Flock & Admire!
This step should be self-explanatory. Assuming you followed the previous steps correctly, the fortress paints very nicely. All the texture allows for easy dry-brushing and highlighting. Now, I suggest you download the "Siege of Danzig (1807)" scenario and put this fortress to the test!
UPDATE: It has been brought to my attention that Rafael Pardo's outstanding Napoleonic wargaming site also has a tutorial on constructing a Vauban-style fortress. Check out his tutorial by clicking here. He has a much different construction method.
UPDATE: It has been brought to my attention that Rafael Pardo's outstanding Napoleonic wargaming site also has a tutorial on constructing a Vauban-style fortress. Check out his tutorial by clicking here. He has a much different construction method.