TERRAIN TIPS
Every war-gaming "grognard" knows that a well designed table-top makes the difference between a good battle and a great one. Nice terrain and scenery can be expensive to purchase, but there are plenty of ways to design a battlefield on the cheap. Here are some tips and tricks for building your own 15mm terrain.
HOW TO MAKE YOUR OWN 15mm SCENERY
Fences & Stone Walls
Purchasing pre-made fences and walls can be quite expensive--especially because you'll need a large quantity to line roads, fields, and villages. For those with the necessary patience, it's quite simple to build your own fences and stone walls.
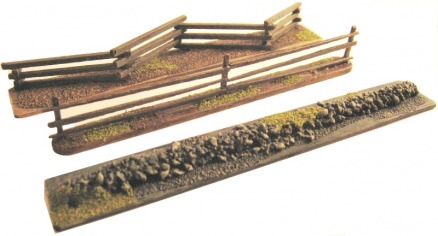
There are several methods for building 15mm stone walls, but the wall to the right was made by gluing a narrow stick of balsa wood on top of a wider base. Coat the narrow balsa strip with glue, then sprinkle finely crushed gravel over the glue. Believe it or not, kitty litter works well, if gravel is not available. Before painting, it's a good idea to take an old brush and cover your new stone wall with watered-down craft glue. This adds some durability.
Building wooden fences requires more patience. Two different styles of fences are pictured to the right. The split-rail fence on top was made by stacking match sticks on top of each other and gluing each joint along the way. The fence is mounted on a wide tongue depressor. The more traditional fence in the middle was built with flat toothpicks, carefully glued while the fence was laying flat on a table. Once the glue is dry, you can erect the fence on a popsicle stick base. Using either method it's possible to construct about four feet of fences in less than one hour.
Trees & Hedges
Trees are pretty simply--just buy them. Woodland Scenics (among others) sells value packs of various trees for very reasonable prices. Trees can be a real pain to make yourself, and why bother when premade, quality trees are so cheap?
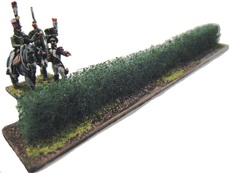
Hedges are also nice to have, for the same reason you need fences and stone walls. The main difference is that hedges are much less time-consuming to make yourself. Stop by the grocery store and buy a few Scotch-Brite scrub pads (of the dark green variety). Simply cut the pads into thin strips and mount the hedges on popsicle sticks, balsa wood, or whatever basing material you prefer. To add color, dry-brush the green pad with a lighter shade of green paint.
Hedges are also nice to have, for the same reason you need fences and stone walls. The main difference is that hedges are much less time-consuming to make yourself. Stop by the grocery store and buy a few Scotch-Brite scrub pads (of the dark green variety). Simply cut the pads into thin strips and mount the hedges on popsicle sticks, balsa wood, or whatever basing material you prefer. To add color, dry-brush the green pad with a lighter shade of green paint.
Roads
Not only do roads enhance the appearance of a tabletop, roads often have a direct impact on game-play. They can enable faster movement, and road exits might be victory objectives in a scenario. Fortunately, roads are once of the cheapest scenery elements you can make yourself. Visit the local craft store and purchase a large piece of brown felt. Cut the felt into strips (about 1" wide for 15mm scale), and you suddenly have a road network! To add texture and color, you can spray the felt with a lighter brown spray paint. This also adds some rigidity to the felt, keeping your new roads flatter over time.
Fields & Pastures
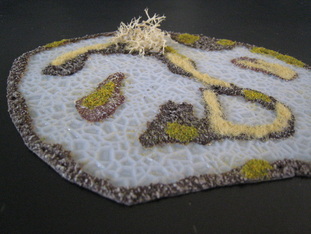
Most battles in the Napoleonic era were fought in open areas so that troops could maneuver properly. But nothing looks worse on a tabletop than empty space. Filling the empty space with fields and pastures is one of the quickest, cheapest ways to enhance your battlefield.
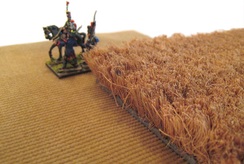
Visit a local craft or fabric shop and pick out fabrics with texture--corduroy has the look of a ploughed field. I use two different shades of brown corduroy for most of my fields. If you need a wheat field, cut up a cheap doormat. For under $15 you can purchase enough fields to cover multiple tabletops.
Visit a local craft or fabric shop and pick out fabrics with texture--corduroy has the look of a ploughed field. I use two different shades of brown corduroy for most of my fields. If you need a wheat field, cut up a cheap doormat. For under $15 you can purchase enough fields to cover multiple tabletops.
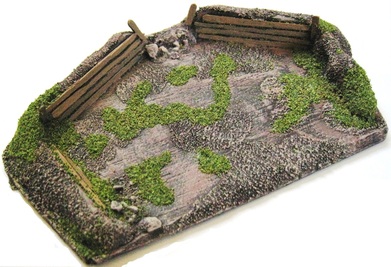
Hasty Earthworks
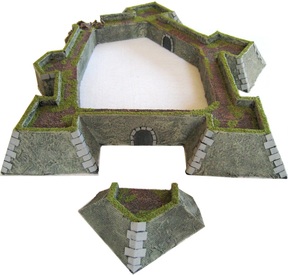
Plenty of Napoleonic engagements featured hasty fortifications, dug and constructed by soldiers on the eve of battle. It's quite easy to make your own dirt earthworks with a stiff basing material (balsa wood, heavy card-stock, popsicle sticks, etc.) and a bag of air-dry putty. I use Crayola Model Magic, sold for $3.99 a bag in the children's aisle of any arts and crafts store.
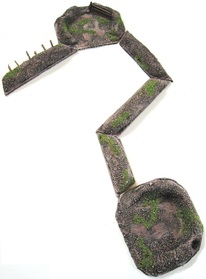
Start by cutting varying lengths of basing material, but with a consistent width. My entrenchments are based on 1/2" wide balsa wood. Remember to carefully cut each edge at an angle--this way, when you assemble multiple sections later, they will resemble a hasty zig-zag formation. Once you've cut a dozen (or more) strips of basing material, press the air-dry putty onto the base, and when it fully dries, coat the earthworks with watered-down craft glue and sand/gravel. Now, just paint and flock!
You can use the exact same materials and a similar method to create artillery emplacements. There is a detailed photo-tutorial on this process for "The Shevardino Redoubt."
Buildings & Towns
If you're on a tight budget and have some craft skills, you can scratch-build your own structures.
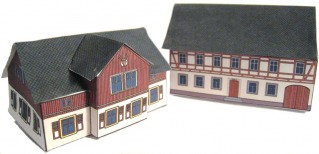
If you're on a tight budget and lack craft skills, you can print out paper buildings on the internet, then fold and assemble these buildings with ease. The houses to the right are paper houses, printed, folded, and glued for free.
But if you have any money in your terrain budget, this is the place to spend it. Buildings dominate a battlefield, and you typically don't need many of them. My buildings are all from JR Miniatures, and cost $5 each, unpainted. For a sharp-looking tabletop, quality buildings are a must.
Scratch-Building Terrain Tutorials
Occassionally, Napoleonic battles require a particular landmark or terrain feature. Plenty of examples abound: the "Great Redoubt" at Borodino, Hougoumont at Waterloo, or the windmills of Lutzen and Gross Beeren. If you want to adorn your tabletop battefield with such historical features, it may be time to venture into the ambitious world of scratch building. Currently, there are photo-filled tutorials on how to scratch-build the following features: